This sample uses markup to change a line’s text before the Line Presenter shows it. Some of it is a palette and a style, which need no code of their own. The rest is three marker processors written for the sample: one hides part of a line, one colours people’s names, and one adds an icon from a sprite sheet.
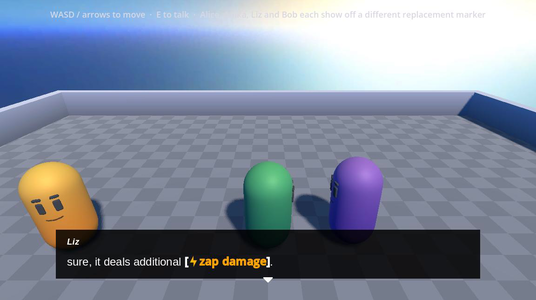
When you run it, there are four characters in the arena, and each one shows something different:
| Character | Yarn Script | What it shows |
|---|---|---|
| Anika | BuiltinReplacements.yarn | A palette with [b], [i], [u], [custom] and [fancy], and a [style=h2] style. |
| Alice | NamedReplacement.yarn | [name], which colours and bolds people’s names. |
| Liz | SpriteReplacer.yarn | [lightning], [ice], [heart] and [fire], which add an icon and colour the text. |
| Bob | DynamicReplacement.yarn | [obscurity], which hides some of Bob’s line, and less of it each time you talk to him. |
Running it
Open samples/replacement_markup/replacement_markup.tscn and press Run Current Scene.
- Move with W, A, S and D, or the arrow keys.
- Walk up to a character and press E to talk to them.
- Press Enter or Space, or click, to continue.
How it works
All the markup is set up by the ReplacementMarkupSetup node. Its settings are in the Inspector:
| Property | What it’s for |
|---|---|
| Dialogue Runner | The Dialogue Runner whose Line Presenters show the markup. |
| Demo Tags Palette | A YarnMarkupPalette resource with Anika’s formatting tags. |
| Styles | The styles for [style], with the BBCode that goes before and after the text. |
| Name Colours | The colour for each person [name] can mark. |
| Buff Colour and Debuff Colour | The colours for the sprite tags. |
| Icon Size | How big the sprite icons are, in pixels. |
| Matched Obscurity | Whether [obscurity] always swaps the same letter for the same symbol. |
When the scene starts, its script makes a processor for each kind of markup from those settings, and registers them on each Line Presenter:
func _ready() -> void:
    if dialogue_runner == null:
        push_error("replacement markup setup: no dialogue runner set")
        return

    var palette_processor := YarnPaletteMarkerProcessor.new(demo_tags_palette)

    var style_processor := YarnStyleMarkerProcessor.new()
    style_processor.styles = styles

    var obscurity := ObscurityMarkupProcessor.new()
    obscurity.matched_replacement = matched_obscurity

    var name_processor := NameMarkupProcessor.new()
    name_processor.entities = name_colours

    var sprite := SpriteMarkupProcessor.new()
    sprite.buff = buff_colour
    sprite.debuff = debuff_colour
    sprite.icon_size = icon_size

    for presenter in dialogue_runner.get_presenters():
        if presenter is YarnLinePresenter:
            palette_processor.register_with_line_provider(presenter)
            presenter.register_marker_processor("style", style_processor)
            presenter.register_marker_processor("obscurity", obscurity)
            presenter.register_marker_processor("name", name_processor)
            for marker in ["lightning", "ice", "heart", "fire"]:
presenter.register_marker_processor(marker, sprite)Marker processors aren’t resources, so they can’t be set up in the Inspector. The script makes them in code, using the settings on the node.
Alice, Liz and Bob each end with a [link] to the script for their markup, and Anika links to this page. The LinkOpener node under the Line Presenter opens them when they’re clicked.
Anika: a palette and a style
Anika’s lines use tags from the palette:
Anika: or [b][i]wombo[u]combo[/i] them[/u] together[/b] even.
Player: that's awesome.
Anika: you can even define [custom]custom[/custom] markers for [fancy]fancy[/fancy] looks.The palette is the node’s Demo Tags Palette. Its Basic Markers have a tag for each of b, i, u and s, which make the text bold, italic, underlined or struck through. It adds two tags of its own:
customis a basic marker that makes the text green, bold and underlined.fancyis in Custom Markers. It makes the text yellow and twice the size, and puts it in square brackets.
| Key | Value | What it means |
|---|---|---|
marker | fancy | The tag’s name. |
start | [color=#ffff00][font_size=48][lb] | The BBCode to put before the text. [lb] shows a [. |
end | [rb][/font_size][/color] | The BBCode to put after the text. [rb] shows a ]. |
marker_offset | 1 | How many visible characters it adds before the text: the [. |
total_visible_character_count | 2 | How many visible characters it adds in all: the [ and the ]. |
Then Anika uses the h2 style:
Anika: If you have a defined [style=h2]style[/style] in a style marker processor we can pass it through to the text label.The h2 style is in the node’s Styles. Its start is [font_size=36][b][color=#4080ff] and its end is [/color][/b][/font_size], so the text is bold, blue, and one and a half times the size of the rest of the line.
See Your own formatting tags and Your own styles for how palettes and styles work.
Alice: names
Alice’s lines wrap people’s names in [name]:
Alice: Hey there [name]Player[/name].
Player: Hey there [name]Alice[/name], what up?
Alice: I show off how you can use markup to flag important elements based on contents.
Player: oh?
Alice: yes, so for example I am just wondering what [name]Bob[/name] is up to.
Bob: Why are [name=alice]you[/name] wondering what [name=bob]I[/name] am up to?NameMarkupProcessor works out who each tag is about, and colours them:
func process_replacement_marker(
    marker: YarnMarkupAttribute,
    child_builder: Array,
    _child_attributes: Array,
    _locale_code: String
) -> ReplacementMarkerResult:
    var entity := marker.try_get_string_property("name")
    if entity.is_empty():
        entity = child_builder[0]

    var invisible := 0
    var key := entity.to_lower()
    if entities.has(key):
        var colour: Color = entities[key]
        var prefix := YarnMarkupParser.brackets_to_tags("[color=#%s][b]" % colour.to_html(false))
        var suffix := YarnMarkupParser.brackets_to_tags("[/b][/color]")
        child_builder[0] = "%s%s%s" % [prefix, child_builder[0], suffix]
        # The wrapped tags add no visible characters.
        invisible = prefix.length() + suffix.length()

return ReplacementMarkerResult.new([], invisible)[name=bob]I[/name], the person is the tag’s value, so the word “I” is coloured as Bob. With [name]Bob[/name], there’s no value, so it’s the text inside the tag.brackets_to_tags, or its brackets are shown on screen as text.The node’s Name Colours has a colour for player, alice and bob.
Liz: icons
Liz’s lines use one of four sprite tags, depending on which item the player asks about:
-> My Sword
    Liz: sure, it deals additional [lightning]zap damage[/lightning].
-> My Sunglasses
    Liz: sure, it makes you [ice]look cool[/ice].
-> My pet lizard
    Liz: sure, it provides [heart]companionship[/heart].
-> My flamethrower
Liz: well it is called a [fire]flame[/fire]thrower so I think you can work that one out yourself.SpriteMarkupProcessor puts an icon from sprites/effects.png in front of the text, and wraps both in bold square brackets. Each tag uses a different part of the sheet. [ice] and [heart] use the Buff Colour, blue, as good effects, and [lightning] and [fire] use the Debuff Colour, orange, as harmful ones.
    var sprite: Dictionary = _sprites[marker_name]
    var colour := buff if sprite["buff"] else debuff
    var image := "[img width=%d height=%d region=%d,0,%d,%d]%s[/img]" % [
        icon_size, icon_size, sprite["column"] * SPRITE_CELL, SPRITE_CELL, SPRITE_CELL, SPRITE_SHEET
    ]

    # Bold brackets around everything, the effect colour on the icon and the
    # wrapped text.
    var prefix := YarnMarkupParser.brackets_to_tags("[b][lb][color=#%s]%s" % [colour.to_html(false), image])
    var suffix := YarnMarkupParser.brackets_to_tags("[/color][rb][/b]")

    child_builder[0] = "%s%s%s" % [prefix, child_builder[0], suffix]

    # The bracket and the icon are the only visible characters added at the
    # front, and the closing bracket at the end; the rest is bbcode.
    var visible_prefix := 2
    var visible_suffix := 1
    var invisible := (prefix.length() - visible_prefix) + (suffix.length() - visible_suffix)

    for i in range(child_attributes.size()):
        var attr: YarnMarkupAttribute = child_attributes[i]
child_attributes[i] = attr.shift(visible_prefix)[img] tag that shows one square of the sheet, at the Icon Size.brackets_to_tags.[ are two visible characters added before the text, so any markup inside the tag moves along by two, to stay lined up with the right characters.Bob: text that gets clearer
Bob’s line is wrapped in [obscurity], with the value of $obscurity:
title: Bob
---
/// tracks how much of Bob's speech we understand. The more we talk to him the more we learn of how he speaks
<<declare $obscurity = 0>>

Bob: [obscurity = {$obscurity}]Why hello there, it's nice to meet you friend.[/obscurity]

=> Alice: yeah sorry about Bob, he's hard to understand. <<if $obscurity < 3>>
    Alice: stick with it, you'll get it though.
    <<set $obscurity += 1>>
=> Player: Hey Bob, nice to meet you <<if $obscurity > 2>>
    Alice: See, practice makes perfect!
    Bob: Check out the [link="obscurity_markup_processor.gd"]Dynamic Replacement[/link] replacement processor to see how this was done.

===$obscurity starts at 0, so the first time, all of Bob’s line is hidden.$obscurity each time the line runs.$obscurity reaches 3, Alice apologises for Bob, and $obscurity goes up by one.$obscurity is 3, the player can understand Bob. Clicking “Dynamic Replacement” opens obscurity_markup_processor.gd.ObscurityMarkupProcessor reads the tag’s value, and hides part of the text inside it:
func process_replacement_marker(
	marker: YarnMarkupAttribute,
	child_builder: Array,
	_child_attributes: Array,
	_locale_code: String
) -> ReplacementMarkerResult:
	var obscurity_prop := marker.try_get_property("obscurity")
	if obscurity_prop == null:
		var diag := MarkupDiagnostic.new("Missing the obscurity property, we cannot continue without it.")
		return ReplacementMarkerResult.new([diag], 0)

	var level := marker.try_get_int_property("obscurity")

	# 0 hides everything, 1 hides roughly two thirds, 2 hides about a quarter,
	# anything else leaves the text untouched.
	match level:
		0:
			_obscure(child_builder, 1.0)
		1:
			_obscure(child_builder, 0.67)
		2:
			_obscure(child_builder, 0.25)

return ReplacementMarkerResult.new([], 0)[obscurity = {$obscurity}]._obscure() picks letters at random, and swaps each one for a symbol, like ?, # or @. Spaces are never hidden, so the words keep their shape. Matched Obscurity is off, so each hidden letter gets a random symbol. With it on, the same letter always gets the same symbol.
See Writing your own text-changing markup for more about marker processors.
Things to try
- Select the
ReplacementMarkupSetupnode, and in the Demo Tags Palette, change the colour of thecustomtag. Then talk to Anika again. - In
DynamicReplacement.yarn, change<<declare $obscurity = 0>>to1. The first time you talk to Bob, only some of his line is hidden. - In the node’s Styles, change
#4080ffin theh2style to another colour. - Add a colour for
anikato Name Colours, and use[name]Anika[/name]in one of Alice’s lines.