
Localising your dialogue takes five steps:
flowchart TB
  yarn["Yarn Scripts"]
  tags["Yarn Scripts with line tags"]
  csv["Strings CSV"]
  translated["Translated CSV,<br>from your translators"]
  godot[("Translations in Godot")]
  game["Your game, in another language"]
  yarn -->|"1. add line tags"| tags
  tags -->|"2. export"| csv
  csv -->|"3. translate"| translated
  translated -->|"4. import"| godot
godot -->|"5. switch language"| gameAll the buttons for this are in the Yarn Project’s Inspector. Select your .yarnproject file in the FileSystem dock, and look for the Localisation section.
1. Add line tags
A line tag is an ID at the end of a line, like #line:a1b2c3d. Translations are matched to lines by their IDs. A line without a tag gets an ID made from where it is in the file. That ID changes when you edit the Yarn Script, and the line’s translations stop matching it.
To tag every line that doesn’t have one, click Add Line Tags to Yarn Scripts. It edits your Yarn Scripts and adds a tag to the end of each untagged line. Lines that already have a tag keep it.
Line Tagger sets what the tags look like:
| Line Tagger | Example | |
|---|---|---|
| Random | #line:0a1b2c3 | A random ID. This is the default. |
| Descriptive | #line:Start_0200_Bob | Made from the node name, the line’s position and the character. |
If any lines don’t have a tag, the Inspector shows a warning. Tag your lines before you export them, and tag new lines as you write them.
2. Export your lines
Click Export Strings and Metadata as CSV…, and choose where to save the file. The addon writes two files.
The strings file has a row for each line, with its key and its text in your Base Language:
keys,en
YARN_line:tutorial-tom-01,Tom: Uh.. hello?
YARN_line:tutorial-tom-02,Tom: Is anyone there?The metadata file, with -metadata at the end of its name, tells translators where each line comes from: the file, the node, the line number, and any other tags on the line. It doesn’t get imported into Godot.
3. Translate
Give the strings file to your translators. They add a column for each language, with the language’s locale code at the top, like de for German or pt_BR for Brazilian Portuguese:
keys,en,de
YARN_line:tutorial-tom-01,Tom: Uh.. hello?,Tom: Ah. Hallo?
YARN_line:tutorial-tom-02,Tom: Is anyone there?,Tom: Ist da jemand?Each line’s text starts with the character’s name, like Tom:. Translators should keep the name and the colon at the start, but they can translate the name itself.
4. Import the translations
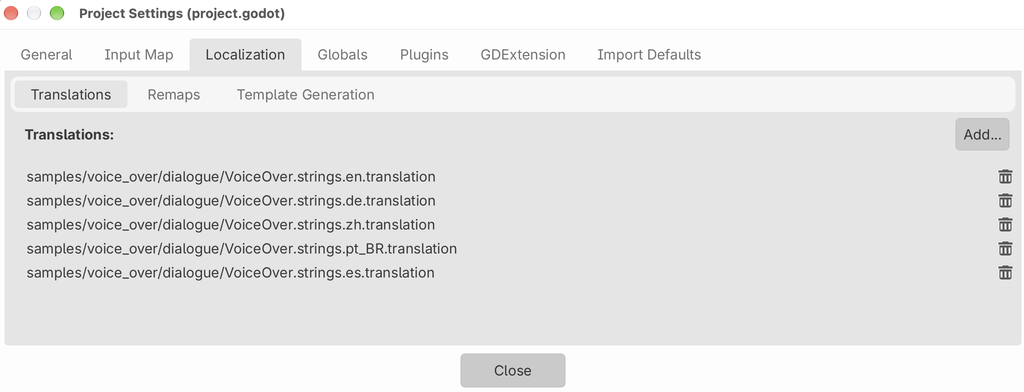
Put the CSV file in your Godot project. Godot imports it as translations by itself, and makes a .translation file for each language next to it, like VoiceOver.de.translation.
Add the .translation files in . Godot then loads them when the game starts.
The Yarn Project’s Inspector shows each loaded language and how many of your lines it has translations for, and lists the strings files that have your lines in them.
5. Switch language
The game’s language is Godot’s locale. Set it with TranslationServer.set_locale(), or with the Dialogue Runner’s set_locale(), which does the same thing:
dialogue_runner.set_locale("de")If a line is on screen when the language changes, it stays in the old language. The next line is in the new one.
Voice clips in other languages
Voice clips use Godot’s translation remaps, not the CSV file. In , add each clip in your base language under Resources. Then select it, and under Remaps by Locale, add the clip for each other language, and choose its Locale:
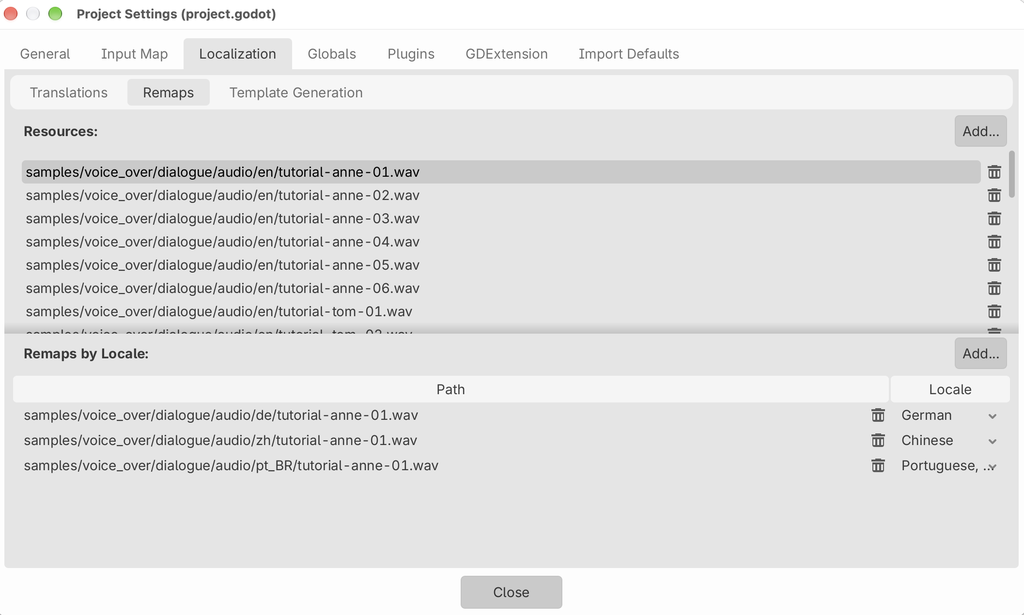
When the game’s language changes, the next line plays the clip for the new language. See Voice-Over for how the Dialogue Runner finds each line’s clip.
Updating translations when your lines change
When you add, change or remove lines, click Update Existing Strings Files. It updates every strings file that has your Yarn Project’s lines in it:
- New lines are added, with their text in your base language and the other languages left empty.
- Lines that no longer exist in any Yarn Project are removed.
- If a line’s text has changed, the base language column gets the new text, and each translation of it gets
(NEEDS UPDATE)in front, so translators can find it.
Every line needs a line tag before you can update strings files.
When a line isn’t translated
If a line has no translation in the current language, the Dialogue Runner shows the text from your Yarn Script. You can change this in the Dialogue Runner’s Line Provider.
The Line Provider is in the Dialogue Runner’s Line Provider property, under Dialogue Setup. If it’s empty, click it and choose New YarnLineProvider to see its settings:
| Property | Default | What it does |
|---|---|---|
| Text Locale Code | empty | The language for text. Leave it empty to use the game’s language. |
| Asset Locale Code | empty | The language for voice clips and other assets. Leave it empty to use the same language as the text. |
| Use Fallback | on | Use another language when a line isn’t translated. If it’s off, the line shows !! ERROR: Missing line! instead. |
| Fallback Locale Code | empty | The language to use when a line isn’t translated. Leave it empty to use the text from your Yarn Script. |
Text Locale Code and Asset Locale Code let text and voice use different languages. For example, to show German text with English voice clips, set Asset Locale Code to en and switch the game to German.
Testing with pseudolocalisation
Godot can replace your text with accented, longer text, so you can find text that doesn’t fit, or that isn’t going through translation. Turn on Use Pseudolocalization in , under Internationalization > Pseudolocalization in the General tab. It only changes text that has a translation, so switch to a language you’ve imported.
[ and ] around pseudolocalised text. Yarn Spinner reads those as markup, and the line comes out wrong. Change Prefix and Suffix in the same settings to something else, like ( and ).The demo scene
This scene runs the conversation from the Voice Over sample, without the audio, using the sample’s translations. The sample’s .translation files are added in , and the Yarn Script’s lines have the same line tags as the sample’s. In the video, the player switches language while the conversation runs, and each new line appears in the new language.
The scene’s theme uses Noto Sans SC, so the Chinese lines show.
extends Control

const LANGUAGES := {
	"en": "English",
	"de": "Deutsch",
	"es": "Español",
	"zh": "中文",
	"pt_BR": "Português (BR)",
}

@export var dialogue_runner: YarnDialogueRunner
@export var languages_label: RichTextLabel


func _ready():
	dialogue_runner.set_locale("en")
	_show_languages()

	# Start again when the conversation ends.
	dialogue_runner.dialogue_completed.connect(
			_start, CONNECT_DEFERRED)
	_start()


func _start() -> void:
	dialogue_runner.start_dialogue("VoiceOver")


# Press 1 to 5 to switch language.
func _unhandled_input(event: InputEvent) -> void:
	var key := event as InputEventKey
	if key == null or not key.pressed or key.echo:
		return
	var index := key.keycode - KEY_1
	if index >= 0 and index < LANGUAGES.size():
		dialogue_runner.set_locale(LANGUAGES.keys()[index])
		_show_languages()


func _show_languages() -> void:
	var current := dialogue_runner.get_locale()
	var text := "[b]Language[/b]\n"
	var number := 1
	for code in LANGUAGES:
		var row := "%d  %s  (%s)" % [number, LANGUAGES[code], code]
		if code == current:
			row = "[color=#ffd35a]%s[/color]" % row
		text += row + "\n"
		number += 1
languages_label.text = textThe Voice Over sample
The Voice Over sample is translated into five languages, with a menu to switch between them. Its strings file is VoiceOver.strings.csv, and its .translation files are added in the sample project’s settings.